Transform Your $25 AliExpress Display into a Home Assistant Dashboard with This Innovative Open-Source Web Editor

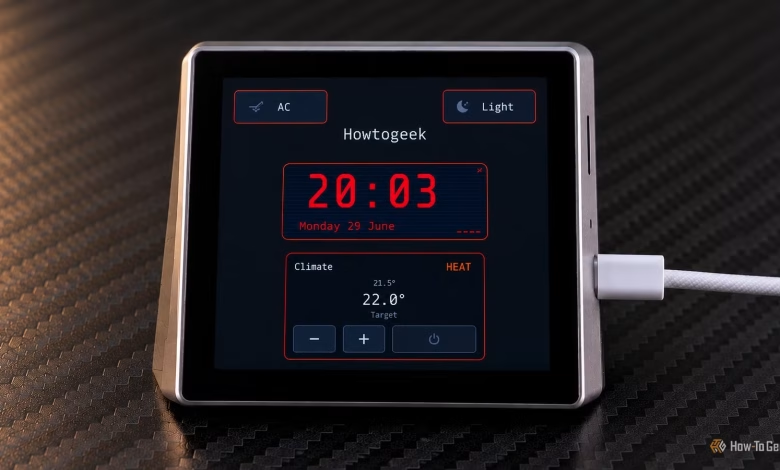
Using a dedicated smart-home control panel can significantly enhance the user experience with Home Assistant. It allows you to manage lights, monitor weather, and adjust your thermostat with just a tap on the screen, eliminating the need to grab your phone. However, these specialized displays can often be overpriced relative to the components they contain.
In contrast, affordable ESP32 touchscreen displays provide a budget-friendly solution for constructing a Home Assistant dashboard. While developing a custom interface may demand some programming knowledge, vESP Cloud offers a simplified, user-friendly platform with its free visual editor. This tool enables you to design your dashboard directly in a web browser and generate the corresponding firmware without having to code everything from scratch.
Create Dashboards Using a Visual Editor
Effortlessly Arrange Widgets
The underlying hardware for this initiative is the Guition ESP32-S3-4848S040, which features a 480 × 480 RGB touchscreen, an ST7701S display driver, and a GT911 touch controller. It’s readily available on various online marketplaces, making a small smart-home control panel a viable project. However, the unique advantage of vESP Cloud lies in its browser-based editor. Instead of relying on configuration files to specify each element’s position and appearance, you simply drag and drop widgets onto a canvas that mimics your physical display, adjusting their settings as needed.
Each project begins with a Home page and a 480 × 480 canvas. You can add additional dashboard pages, rearrange them, and create specialized views for controls that don’t need to be constantly visible. For instance, your main screen might show the current temperature and lighting status, while a separate view could provide advanced climate settings.
The editor supports a diverse array of widgets, including text, digital clocks, buttons, icons, rectangles, light controls, HVAC settings, weather updates, calendars, images, and to-do lists. Widgets are adjustable in size and placement to fit your desired layout. You can also organize content through tabs and conditional areas, enabling multiple widget groups to reside in the same space and allowing content to change based on Home Assistant states or time.
This flexibility lets you create an interface tailored to your home environment. For example, a media control area might display playback options when a media player is active and show shortcuts for starting playlists during idle moments. The editor also features both retro and modern themes, so you can choose aesthetics that suit your preferences, avoiding the limitations of whatever design the firmware might impose.
Linking the Dashboard to Home Assistant
Display Actual Smart-Home Devices
Setting up your devices in the editor involves some initial configuration. The project includes an integration called HA Metadata Exporter, which allows your Home Assistant entities and their details to be exported to a JSON file. You can import this file into vESP Cloud, making it easy to locate your devices without manually searching for entity IDs. However, one drawback is that the export isn’t automatic; you’ll need to regenerate the file whenever there’s a change in your entities.
After establishing the connection, you can create a dashboard that reflects your actual home activities. Features like lights and thermostat controls can be front and center, along with quick-glance weather information, or a visible space for your calendar and to-do lists. Buttons can also interact with Home Assistant services, complete with confirmation prompts for actions that could be misactivated. Additionally, an optional notification overlay can display messages over the current screen for important alerts.
Creating and Installing the Firmware
Load the Dashboard onto Your Device
Once your layout is complete, you can generate the firmware to install on your compatible display. The initial setup requires a USB-C data cable and a supported browser. If the display isn’t configured for your home network, it can temporarily create a Wi-Fi network for setup. Connect to this, access the setup page, and input your Wi-Fi password. Notably, this part is handled directly between your browser and the display, providing an extra layer of security.
Following this, you’ll need to integrate the ESPHome device into Home Assistant, ensuring it has the necessary permissions for its widgets to function. Future firmware updates can be applied through Home Assistant, allowing you to modify the editor, generate the updated firmware, and install it without having to reconnect the display to your computer every time. This streamlines the process, especially during layout adjustments and refinements.
Cost Structure of the Editor
Decide Between Local Compilation or Pay-for-Access
Utilizing vESP Cloud’s visual editor is free, and it enables you to create configuration files that can be exported for use with your own ESPHome installation. This option is ideal for users who are familiar with ESPHome and prefer full control over the process. You can inspect and modify the generated configurations without incurring charges for hosted compilation.
If you would rather not handle the compilation yourself, vESP Cloud offers a credit-based system for on-demand builds. You can purchase credits to compile firmware through the cloud service without committing to a subscription. This option is about convenience, mainly benefiting those who prefer not to manage local compilations.
Is vESP Cloud Worth Trying?
vESP Cloud addresses one of the more challenging aspects of setting up a DIY Home Assistant dashboard by making it easy to transform an affordable touchscreen into a functional control panel without having to code the entire setup manually. Its visual editor, comprehensive widget library, integration capabilities, and firmware generation simplify the creation of a dedicated interface.
While there are a few limitations, such as device support being restricted to the Guition ESP32-S3-4848S040 and the requirement to refresh the entity metadata as your setup changes, vESP Cloud is worth considering if you’re using Home Assistant and want a touchscreen for daily operations instead of investing in an expensive dedicated display.